It’s an unconventional requirement, but I needed to create an MSI that would install a SharePoint solution package to a SharePoint server farm, as well as add a registry entry so that a new SharePoint ULS log “area” could be tracked from the “Configure Diagnostic Logging” page.
The problem is that Setup projects in Visual Studio are by default 32 bit and they need to run PowerShell scripts in a 64 bit SharePoint environment. At first I tried executing commands using the default commad prompt, then I tried executing the necessary commands from both the 32 bit and 64 bit command prompts, but that did no good. I finally clued into the fact that I needed to be executing the 64 bit version of PowerShell from the command line. (I honestly didn’t even know there were two versions of PowerShell installed on my server!) What made this all the tricker is that I needed to be able to pass the location of the MSI’s installation directory to the PowerShell script so it would be able to pass the -Location parameter to the Add-SPSolution PowerShell command.
This setup project doesn’t do any testing to see if the person installing MSI has Farm Administrator permissions, or ask if they want to install or uninstall the solution in a particular web app, etc. I haven’t written Setup projects in years so I’m sure there are better ways out there of doing it. (Check out this blog posting, for example: http://collaboris.co.uk/blogs/blog-post/mark-jones/2011/05/28/building-an-msi-in-visual-studio-2005-2008-2010) However, after all the work I put into this, I thought I’d at least post what I did so others might have a starting point if they want to do something similar.
The first thing we need to do is to create a PowerShell script that will add the solution package to the server farm. The script is simple: it adds the SharePoint snap-in, then adds the solution using a paramter that was passed into the script. This is what it looks like:
Add-PSSnapin Microsoft.SharePoint.PowerShell $CurrentDir = $args[0] $SolutionName = "MySolutionPackage.wsp" $SolutionPath = $CurrentDir + $SolutionName
Add-SPSolution $SolutionPath
We’ll save this file as Install.ps1. The next thing we need to do is create a batch file that will execute this PowerShell script using the x64 version of PowerShell. The batch file also takes a parameter, which it’s going to pass right along to the PowerShell script. We’ll save this batch file as Install.bat.
cd /d %~dp0
%WINDIR%\SysNative\WindowsPowerShell\v1.0\powershell.exe -file .\Install.ps1 "%~dp0
The %~dp0 token is the path to the current directory. Since the PowerShell script will be installed to the same location as the PowerShell script, and that’s the same location where the WSP package is, this batch file is essentially telling the PowerShell script that the WSP’s -Location paramter is the current directory.
Next, we’re going to create a VBScript file that will execute the batch file using the command line. We’ll need to know the location of the Install.bat file, so we’ll use a Custom Action in the Startup project to pass the installation directory value to the VBScript. The VBScript file, Install.vbs looks like this:
Set oShell = CreateObject("WScript.Shell")
Dim installDir
installDir = Session.Property("CustomActionData")
Return = oShell.Run("""" & installDir & "Install.bat""", 1, True)
Set oShell = Nothing
Now that we have Install.vbs, Install.bat, and Install.ps1, add each of these to the Setup project using the File System Editor. Of course, also add the solution package itself to the Setup project, too, using the File System Editor.
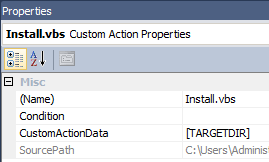
Next, go to the Custom Actions Editor and add Install.vbs to the Install action. In the Properties window, next to CustomActionData, type [TARGETDIR]. This is a token containing the value of the installation directory path. We’re assigning it to the CustomActionData property, which is getting retrieved from the VBScript.

So, to recap, Install.vbs will be called when the MSI is getting installed. Install.vbs will call Install.bat, using the installation directory path CustomActionData property to know where the BAT file is located. Install.bat will then use 64 bit PowerShell to execute Install.ps1, a PowerShell script that will add the solution to the solution store, using the current folder location as a paramter.
Install.vbs –> Install.bat –> Install.ps1
We’re now going to do the same thing in reverse. We’re going to create Uninstall.ps1 that will contain these two lines:
Add-PsSnapin Microsoft.SharePoint.PowerShell
Remove-SPSolution -Identity MySolutionPackage.wsp -Confirm:$false
Then we’ll write Uninstall.bat, that will contain this:
cd /d %~dp0
%WINDIR%\SysNative\WindowsPowerShell\v1.0\powershell.exe -noexit -file .\Uninstall.ps1
Finally, we’ll write our Uninstall.vbs script that will look like this:
Set oShell = CreateObject("WScript.Shell")
Dim installDir
installDir = Session.Property("CustomActionData")
Return = oShell.Run("""" & installDir & "Uninstall.bat""", 1, True)
Set oShell = Nothing
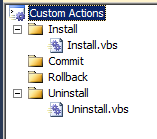
As before, we’ll add these three files to the project using the File System Editor, and we’ll assign Uninstall.vbs to the Uninstall custom action in the Custom Actions Editor, also assigning [TARGETDIR] to the CustomActionData.
Your Custom Action Editor should look like this:

You File System Editor should look like this:

Last but not least, if you want to add a registry key to your project, use the Registry Editor to do so.
